Making a SharePoint Workflow Delay Activity Configurable

If you are creating a SharePoint Workflow with a Delay Activity in Visual Studio, and want to be able to change the delay timeout through a configuration file—for example: to have a short delay for testing and a longer delay in production without having to recompile your code—then this setup is actually quite simple.

I’ve decided to write this short post because, although this is really the same as reading a config entry from any other .NET based program, SharePoint workflows can be a little intimidating and make you think that things aren’t as simple as they are in, say for example, a straight ASP.NET web forms app.

However, it really is this simple:

  1. Add an AppSettings entry to the web.config in your Virtual Directory location (i.e. C:\inetpub\wwwroot\wss\VirtualDirectories\MySharePointSite\web.config) something like this:
  2. <appSettings>
    <add key=”WorkflowDelayTimeoutDuration” value=”00:05:00″/>
    </appSettings>

  3. Read the app setting value from the code behind of your workflow for the delay activity in the Invoked event handler (notice I put a default value in the else block) :

  4. private void onWorkflowActivated1_Invoked(object sender, ExternalDataEventArgs e)
    {
    workflowId = workflowProperties.WorkflowId;


        if (ConfigurationManager.AppSettings["WorkflowDelayTimeoutDuration"] != null)
    {
    delayActivity1.TimeoutDuration = TimeSpan.Parse(ConfigurationManager.AppSettings["WorkflowDelayTimeoutDuration"]);
    }
    else
    {
    delayActivity1.TimeoutDuration = new TimeSpan(1, 0, 0);
    }
    }
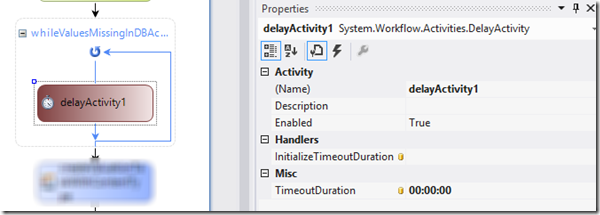
  5. For your reference, here is what my Properties window looks like in this scenario:

image

Programmatically determine Parent Web’s Absolute URL from SharePoint Client Object Model ListItem

Ok, after a frustrating while of trying to figure out an easy way to get the FULL (Absolute) URL for a ListItem’s parent web using the SharePoint Client Object Model I discovered one thing for sure: There are an abundance of ways to easily find the ServerRelativeUrl for many objects in the Client OM, but that is not what I needed.

After talking to a co-worker, we finally found an easy way to get the parent web’s absolute URL when dealing with at Client OM ListItem.  The key is looking at the Context.

Assuming that you have a variable called “item” that represents an SP Client OM ListItem, you can get the full URL for the parent web like this:


string parentWebAbsUrl = item.ParentList.ParentWeb.Context.Url;

Sometimes it’s the simple things that get you.  Hope that helps you save some time!  Thanks for reading.

Programmatically determine List Type in SharePoint Client Object Model

If you would like to programmatically determine a List Type in C# using the SharePoint Client Object Model, then all you need to do is compare the list’s BaseTemplate, which is an integer identifier, to one of the ListTemplateType enumeration values—casting it to an int as seen below:

bool isDocumentLibrary ;
using (ClientContext clientContext = new ClientContext(baseSiteUrl))
{
    Web web = clientContext.Web;
    clientContext.Load(web);
    List list = clientContext.Web.Lists.GetByTitle(listName);
    clientContext.Load(list);
    clientContext.ExecuteQuery();

    if (list.BaseTemplate == (int)ListTemplateType.DocumentLibrary)
    {
        isDocumentLibrary = true;
    }

}

That’s all there is to it.  Now you can take this and modify it in any way that you need to make list type determination more dynamic, if you aren’t just needing to compare to a single ListTemplateType as shown above.

CustomAction Link on Subsite Redirects to Parent Site—SharePoint 2007

I recently had a problem where a Custom Action link that we had added to a SharePoint subsite’s “Create” page was pointing to the relative URL of the parent site.  I discovered that it was because, without a “scope identifier” on the UrlAction element of the CustomAction, the relative URL will default to the root site of a site collection.  So, to fix the problem I added “~site” to the beginning of the URL as you can see here:

<CustomAction Id="CreateCustomPage" GroupId="WebPages"
     Location="Microsoft.SharePoint.Create" Sequence="400"
     Title="Page from Template" Description="Creates a branded page."
    
RequireSiteAdministrator="True"
     I
mageUrl="/_layouts/images/ltblnkpg.gif" >

 <UrlAction Url="~site/_layouts/CustomDirectory/CustomPage.aspx"/>

</CustomAction>

Without including the “~site” statement this will, apparently, default to the root of the site collection, which means your subsites will redirect back to the root site without it.  After adding this everything worked fine.  All of my subsites go to the proper relative URL of their own.

Andre Vala has a great blog post that discusses SharePoint Custom Actions in greater detail.  This blog also explains the other items that you can place at the beginning of the UrlAction’s URL besides ~site (i.e. ~sitecollection and others), and it helped me to figure this problem out fairly quickly.

Technorati Tags: ,,,,,,,,,

Windows Live Tags: WSS,MOSS,CustomAction,Subsite,Parent,SharePoint,Custom,Action,UrlAction,Microsoft