Making a SharePoint Workflow Delay Activity Configurable

If you are creating a SharePoint Workflow with a Delay Activity in Visual Studio, and want to be able to change the delay timeout through a configuration file—for example: to have a short delay for testing and a longer delay in production without having to recompile your code—then this setup is actually quite simple.

I’ve decided to write this short post because, although this is really the same as reading a config entry from any other .NET based program, SharePoint workflows can be a little intimidating and make you think that things aren’t as simple as they are in, say for example, a straight ASP.NET web forms app.

However, it really is this simple:

  1. Add an AppSettings entry to the web.config in your Virtual Directory location (i.e. C:\inetpub\wwwroot\wss\VirtualDirectories\MySharePointSite\web.config) something like this:
  2. <appSettings>
    <add key=”WorkflowDelayTimeoutDuration” value=”00:05:00″/>
    </appSettings>

  3. Read the app setting value from the code behind of your workflow for the delay activity in the Invoked event handler (notice I put a default value in the else block) :

  4. private void onWorkflowActivated1_Invoked(object sender, ExternalDataEventArgs e)
    {
    workflowId = workflowProperties.WorkflowId;


        if (ConfigurationManager.AppSettings["WorkflowDelayTimeoutDuration"] != null)
    {
    delayActivity1.TimeoutDuration = TimeSpan.Parse(ConfigurationManager.AppSettings["WorkflowDelayTimeoutDuration"]);
    }
    else
    {
    delayActivity1.TimeoutDuration = new TimeSpan(1, 0, 0);
    }
    }
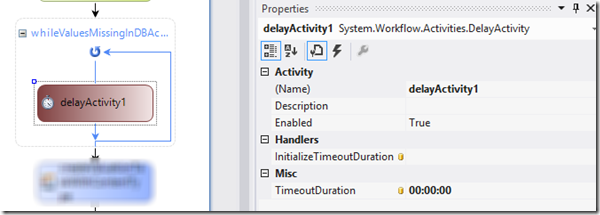
  5. For your reference, here is what my Properties window looks like in this scenario:

image

SharePoint Designer 2007 Workflows—KYSPUG

Thanks to everyone who attended my presentation on SharePoint Designer 2007 Workflows at the Kentucky SharePoint User Group last night.  We had a great turnout and had lots of great interaction.  I want to give a special thanks to Jeremy Sublett of Composable Systems and Greg Kamer of Mirazon for their selfless efforts in running this user group for us.

You can download the slide deck HERE

Here is a quick synopsis of the presentation:

  • What are Workflows?
  • Out of the Box WSS and MOSS Workflows
  • SharePoint Designer Workflows
    • The parts of a SPD WF
    • The ootb actions
    • The wf files that are created
    • The wf forms that are created
    • The browser screens for interaction with the wf
    • Common Problems, Issues, and Limitations

Thanks!

Technorati Tags: ,,,,,,,,,,,,,,,,

Windows Live Tags: SharePoint,Designer,Workflows,KYSPUG,Kentucky,User,Group,Jeremy,Sublett,Composable,Greg,Kamer,Mirazon,MOSS,Problems,Limitations,Systems

SharePoint Yes/No Column Problems

I have been dealing with some issues concerning the Yes/No column in SharePoint, and I ran across this blog post by John Ross.  He shares some good information in it, and he helped push me over the edge with the opinion that I was beginning to form about Yes/No columns—that you are better off just using a Choice column with the text values of “Yes” or “No” rather than an actual Yes/No column. 

Read John’s blog post to discover his reasons.  One of my main reasons is this:  You will have to deal with the values from these fields showing up as “True” and “False” if you want to display them through a SharePoint Designer Workflow (e.g. in an email).  If it is not acceptable to have them display as True/False, then you will have to add some more complex steps to your workflow that first test for what the value of your Yes/No column is and set a variable to the text of “Yes” or “No” based on what the value of your column is.  Then you will have to use this variable to display the value of your Yes/No column throughout the rest of the workflow.

By having to deal with these extra problems (mine and those that John points out), I am of the opinion that it is usually best to simply use a Choice column rather than a Yes/No column unless you have a legitimate business reason to have to use the Yes/No column.  Thanks for your insight, John.

SharePoint Designer 2007 Workflows—Can’t Specify a Task List

When you are creating workflows with SPD you may find that you need more than one Task type.  For example, you may have a VP Approval Task and a Job Posting Announcement task that get created at some point in the workflow.  Well, outside of the SharePoint Designer world you may choose to use separate Task lists for these different types of tasks.  However, SPD workflows will not let you specify a Task list when you are creating Task list items, either by using the “Create Task Item” action or “Collect Data from User” action.  So, if you have 5 different tasks being created by the SPD workflow, then all 5 task types must go into the same Task List.  Well, what if you need different workflow actions to take place based on which Task Type was added to the list?

I have found no way around getting SPD workflows to enter different Task Types into separate Tasks Lists, but I have found a simple and reliable way to be sure that you can do different actions based upon which Task Type has been created in the list through a secondary workflow.  Using the “IF” conditional branches, along with the Content Type field, will save the day when you have multiple Task Types being added into the same Tasks List by SPD Workflows and you need different things to happen based on which Task Type was created.  So, what you need to do is this:

  1. Create separate IF branches in one step (or separate Steps if you prefer—the workflow will simply skip over a step in the case of the IF statement not being TRUE) for each Task type that contains the actions that you want to take place for that task type

  2. On each IF statement, for each Task Type, you need to choose “IF Content Type equals TaskType.”  **This is important, see below.

** Anytime you create a task list item through a SPD workflow a Content Type is created on the Task list with the same name as what you called the Task List Item.  You will notice that the Title field contains the same text as the Content Type, for example if the Task is called “ManagerApproval” then both the Title field and the Content Type field will contain the text “ManagerApproval” when the task is created by the SPD workflow.  However, I have found that trying to make the IF statement be “IF Title equals TaskType” just simply doesn’t work sometimes.  I’m not telling you why, because I don’t know.  Just suffice it to say that using Content Type for the IF branches instead of Title has worked for me every time.

SharePoint Designer 2007—Reusable SharePoint Designer Workflows

Ever had two processes in separate sites that could have used the same or very similar workflows, but you’ve used SharePoint designer workflows?  And of course, as everyone knows, SPD workflows aren’t reusable, right?  Wrong.  Well, it’s not as slick as you might want it to be, and it’s not reusable in the same sense that Visual Studio Workflows are reusable—but it is possible to re-use SPD workflows with a little wiring-up work.  That, of course, is opposed to the alternative of completely rebuilding your SPD workflow from scratch for another site or list.

So, what do you do?  I’ve broken it down into three basic steps that I’ll mention here and then explain in more detail:

  1. Export your workflow as a Personal Web Package, giving it a unique name.
  2. Import it into your other site.
  3. Wire-up the workflow for your new list.

Exporting your Personal Web Package

  1. In SharePoint Designer, Go to File > Export > Personal Web Package
  2. In the “Files in Web Site” column, drill down to the workflow(s) that you want to export.
  3. Highlight your workflow and click Add.
     
  4. Once your workflow appears in the “Files in Package” column Click OK.
  5. Now the save file dialog will appear for you to choose the name and save location for your Web Package.  This saves your package as a .fwp file.

Importing your Personal Web Package

  1. Open your new site in SharePoint Designer
  2. Go to File > Import > Personal Web Package.  This will open up the dialog to navigate to where you saved your web package.
       
  3. Choose your desired web package and click Open.  This will display the following dialog.  You can drill down through your web package and pick and choose which elements that you want to import.
  4. Click Browse to choose the location in the site that you want to import the web package into, and Click OK.
  5. Click Import on the Import Web Package window.
  6. You may see the following window.  If you trust your own web package click Run. 🙂
  7. Your workflow should now be imported.

Wiring-up the Workflow

Now that you’ve imported your workflow all you have to do is:

  1. Open the xoml file.
  2. Choose your list and start-up options.
       
  3. Then go through the workflow and wire-up all of the steps back to the appropriate fields in the new list.  All the logic will still be there, so all you have to do is pick the new fields.

    In many cases you will see circumstances where the fields have not been chosen:
       

    In other cases you will find GUIDS followed by a colon.  These are normally “ListName:Field” in the original workflow.  Here you will simply be choosing the list name and field for the new list.  You will often find that, after clicking on the GUID, the pop-up window that is displayed will reveal the original list and field.  If you simply click “OK” form here you will be set, or you can choose a new list and field.
        

  4. Fortunately, in my testing it seems to me that every time I import one of these workflows on a new site that it automatically replaces the old GUID values in the xoml.wfconfig.xml to the new GUID values.  However, I strongly suggest that you double check this, as well as GUIDs that may be on any custom pages that you generated for a workflow.  If the GUIDs don’t match up to your new lists’ GUIDs, then you will need to replace them here:

To find your list’s GUID you can get it from the URL of your list’s settings page.  For more info check out Step 4 on This MSDN Blog Post.  You may find a few caveats while working with this process that I have missed.  If so, then please feel free to share them.  Thanks!