Adding Table Cell Borders to Empty Cells in a SharePoint DataFormWebPart

If you’ve ever used a DataFormWebPart in SharePoint Designer 2007 with a border on the table, then you may have run into the problem of empty table cells loading without borders.  This causes your table to look very strange in the browser.  Well, here is a fairly simple work around to fix the problem.  All you need to do is add a script block to the xslt in SharePoint Designer that will basically put a space inside all of the cells.  Since this forces the cells to not be empty, they will all render with borders.

Here is the script block and some quick screenshots to demonstrate how it works.

<script type="text/javascript">
    document.write("&amp;nbsp;");
</script>

Here is how the table will render without the script block if there are empty cells:

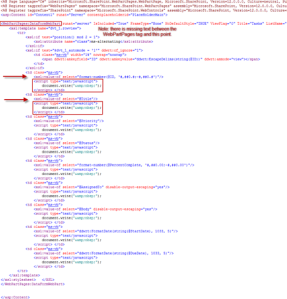
Add the script block inside of the td’s just after the xsl:value-of tags that contain the SharePoint field names that you have included in your DataFormWebPart:

Here is what the new page with blank cells should look like:

Technorati Tags: ,,,,,,,,,,,,

Windows Live Tags: WSS,MOSS,Table,Cell,Borders,SharePoint,DataFormWebPart,Designer,script,forces,Here,text,Cells

Displaying SharePoint List Data in another Site

Can you display a SharePoint List from one site as a Web Part in another site?  Yes, you can.  There are third-party tools that you can buy to do this; however, this blog post will show you how to do it with the FREE SharePoint Designer 2007 tool.

  1. As you can see I have a parent site “Jason’s Site” with a subsite called “Subsite.”  I have created a Web Part page on the parent site that I will use to display list data from the subsite.
  2. First you will need to open the site that you want the data to be displayed on in SharePoint Designer, and make sure that the Data Source Library is showing by going to Data View > Manage Data Sources.  Then you click on Connect to another library…
     
  3. Next, you will go through the following series of screens to navigate to the site that contains the list that you want to display data from.  NOTE: In the Choose a Web Site dialog you will do just that: Choose a Web Site.  Be sure not to actually navigate to the list itself.  Highlight the Site and click Open.

  4. Now you should see the site you chose displayed in the Data Source Library pane.
  5. Next you will need to open up the page that you want to add the Web Part to.  In this case I’m using a page called “ToDisplaySubsiteList.aspx".
  6. Place your cursor just below the <ZoneTemplate> tag, and then add a Data Form Web Part to the page by going to Insert > SharePoint Controls > Data View.  This adds a <WebPartPages:DataFormWebPart> to the page.
  7. Now, with the newly added Data Form Web Part highlighted in the Design screen (it is highlighted by default after being added to the page), drill down to the list that you want to display in the secondary site’s directory in the Data Source Library, click on the drop down menu for the list, and click on Show Data.
  8. Hold down the Ctrl button and click on each field that you want to display in the Web Part.  I’ve selected the first two fields in the screenshot below—“Title” and “Subsite.”  Then click on the drop down Insert Selected Fields as… and choose either Single or Multiple Item View.  I’m choosing multiple item view for this demonstration.
  9. Now your list data from one site will be displayed on another site through a Data Form Web Part.  You can use the Common Data View Tasks window, highlighted below, to fine tune how the Web Part behaves.  I am not getting into the details of how to do that in this post, but I will point out that you can do things like Filter, Sort and Group, set Paging options, and set Parameters for the Web Part (e.g. you can set a Query String Parameter for the Web Part to control what item will be displayed if you chose Single Item View.).
  10. Here is the page loaded in the browser.  We are in the Parent Site displaying list data in a Web Part from a subsite.  IMPORTANT NOTE:  You will need to be sure that individuals that you intend to display this data to on this site have permissions to view the data on the subsite, or the data will simply not appear.

Emails to Groups not working in SharePoint Designer 2007 Workflows

In my time working with clients on SharePoint Designer Workflows I have found a common occurrence that unexpectedly causes workflows to not send emails to a Group.  The workflow may just stop working without any explanation as to why.  The problem may not be with the workflow at all, which makes troubleshooting VERY difficult.

The first thing that I have come to check is the “Who can view the membership of the Group?” setting under Group Settings.  If this is not set to “Everyone,” then the emails will only be sent if members of the group initiate the workflow.

Here are some screenshots to help those of you out who may need some instructions on how to check and change this setting:

  1. Click on People and Groups on the Quick Launch bar of your site.
  2. Either select an existing Group from the Quick Launch, then click Settings > Group Settings, or click New to set up a new group.  Both options will take you to very similar screens where the option can be set.
  3. Either from the New Group or Edit Group page you simply need to set the Group to be viewed by everyone under the Group Settings section.  Click OK, and test out your workflow emails again.  They will work fine if this was the only issue underlying your problem.

A special thanks to Bryan Phillips for teaching me this quick trick!

SharePoint Designer 2007—Adding more than One Web Part to a Custom Form

If you’ve created many custom forms in SharePoint Designer, it is likely that at some point you have used the DataViewWebPart to display data from a SharePoint list on your form.  They serve as a quick, simple way to throw data up on a page with the ability to scroll back and forth through the items in a list, or you can easily set filters based on the Query String, Server Variables, and a few other things.  

Well, what if you need to add more than one to the page to display data from more than one list?  Have you ever ran into the problem of not being able to add more than one Web Part to the page?  I was just about to go crazy a couple of days ago trying to figure out why SPD 2007 would not let me add more than one DataViewWebPart to a custom aspx page.  I kept clicking, refreshing data sources, closing and reopening SPD only to keep having that little “Insert Selected Fields As..” button to remain grayed out like this:

  or like this: 

Once I figured out what the issues were I couldn’t believe how simple the solution was, and I couldn’t believe how much time I spent trying to solve the issue.  Well, the first one (with “Item(s)” grayed out) was fairly simple to figure out.  Apparently SPD doesn’t like you trying to enter a second Web Part to a page while it is dirty, which means containing unsaved changes and is indicated by the little * on the page’s tab:

So, the answer in this case is to simply Save your page and then add the Web Part; however, the second one above was the real headache—with the whole button grayed out.  After a while of searching blogs I could find nothing about why SPD would not let me add a second DataViewWebPart.  Finally, I figured it out.

In the same way that Web Parts are added to a Web Part Page in the browser when designing a SharePoint page—the newest Web Part is always added to the top—SPD would not let me add a new DataViewWebPart BELOW the one that was already on the page.  As soon as I put my cursor above the other Web Part on the page the problem was solved.

So, to save yourself some time if you intend to add more than one Web Part to a page in SharePoint Designer, plan to add the Web Parts from the bottom up.  As a side note, as you hold down CTRL to choose the fields that you are going to add to the DataViewWebPart in the Data Source Details Pane be sure to click on them in the order that you want them to appear, and that is the order that they will be added to the page.  Just another simple time saving technique.  Have fun!