Windows Server AppFabric Cache Setup Problems

I wanted to let my readers know that I recently posted a new blog on my company’s blog about some caveats to installing and running programs against Windows Server AppFabric Cache.

In the article, linked to below, I cover what type of environment we were dealing with, and two (seemingly undocumented) problems that we had to overcome.

http://blog.composablesystems.com/windows-server-appfabric-cache-setup-problems

How to Convert an HTML page into an ASP.NET Master Page

I’ve been moving more and more into using MVC and the Razor view engine in my projects; however, sometimes I still like web forms.  Yes, you read that correctly!  Now, if you haven’t written me off as just a stone age Luddite—and are interested in a simple step-by-step explanation of how to convert an HTML page into an ASP.NET Master Page, then keep reading.  And yes, I do know that you can use ASPX as the view engine for MVC. Winking smile

I decided to post this after finding it very difficult to find a simple “step-by-step” online to show my students.

Step by Step Instructions

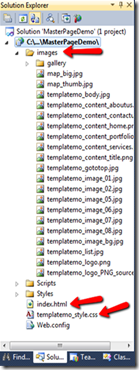
1. Make sure all of your site assets are already put together in a single project inside of Visual Studio (i.e. images, scripts, css, etc). In my case I have an index.html page that holds the HTML that I want to convert to a MasterPage, a css file that is referenced at the same level as the index page, and an images folder.  [For this example I’m using the free “Corners” template found at www.templatemo.com, an awesome free templates website.]
clip_image002

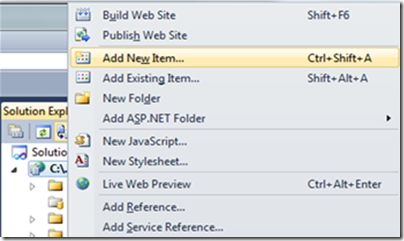
2. Add a MasterPage to your site by right-clicking the Project and choosing Add New Item > Master Page, then click Add.
clip_image004

clip_image006

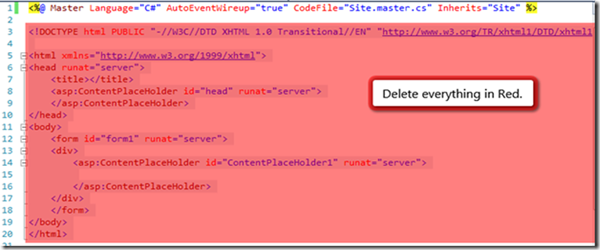
3. Then delete everything below the Master Directive in the new Master Page.
clip_image008

4. Then copy all of the HTML from your existing HTML page below the Master directive.
clip_image010

5. Add a ContentPlaceHolder to the <head> tag with a meaningful ID (e.g. “HeadContent”)
clip_image012

6. Add opening and closing “form” tags around everything inside the <body> tag as shown below.
clip_image014

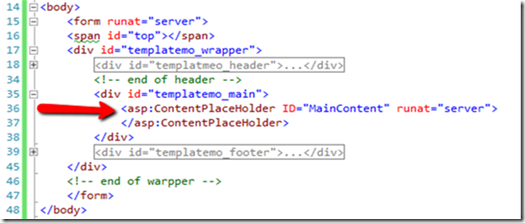
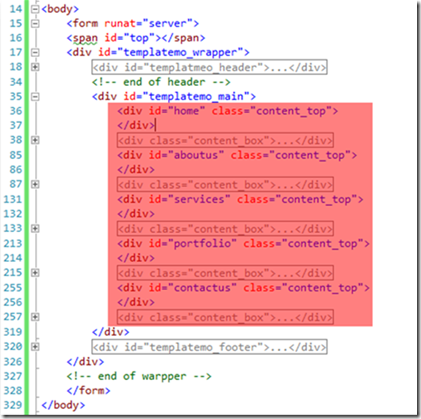
7. This is the step that can be a little trickier, or at least more subjective. Choose the section of your html that you want to be the “MainContent” area, and remove all the existing HTML from that area—replacing it with a ContentPlaceHolder control. NOTE: you may want to paste the HTML you remove into a some other file now for safe keeping in case you desire to use it in a Content page later.
clip_image016

clip_image018

8. Be sure to Save the changes to your MasterPage. Also, at this point you may choose to add any additional ContentPlaceHolders that you may want.

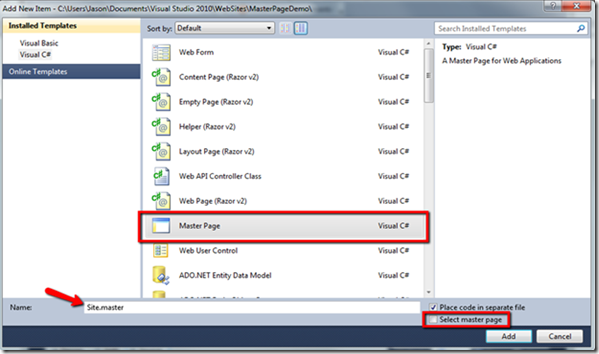
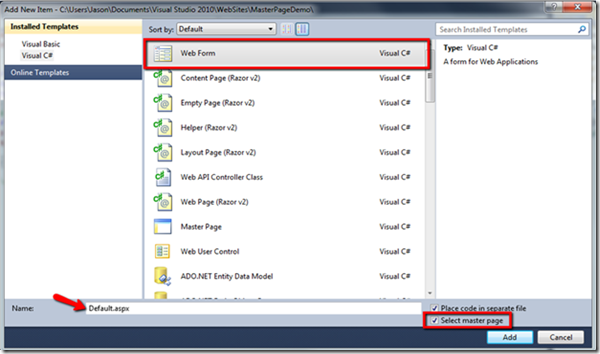
9. Now to add a new page using your master page you need to right-click on the project, and go to Add New Item > Web Form, and be sure to check the “Select master page” check box as indicated below.
clip_image020

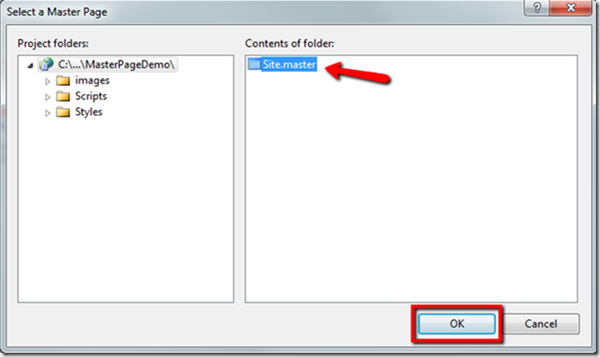
a. Clicking Add will cause the “Select a Master Page” dialog to show. Highlight your new MasterPage, then click OK.
clip_image022

10. You should now see a new page open that clearly indicates it is referencing your new Site.master page, and has a Content control for each of the ContentPlaceHolder controls that you added to your master page.
clip_image024

11. Now you can begin to add head and content information to the new content page. You may choose at this point to paste in the HTML that you removed from the “MainContent” section of the MasterPage into the “MainContent” Content control.
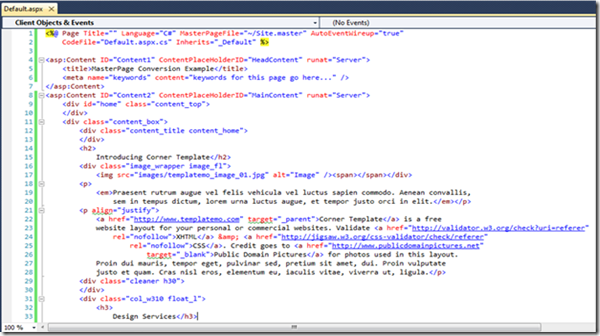
clip_image026

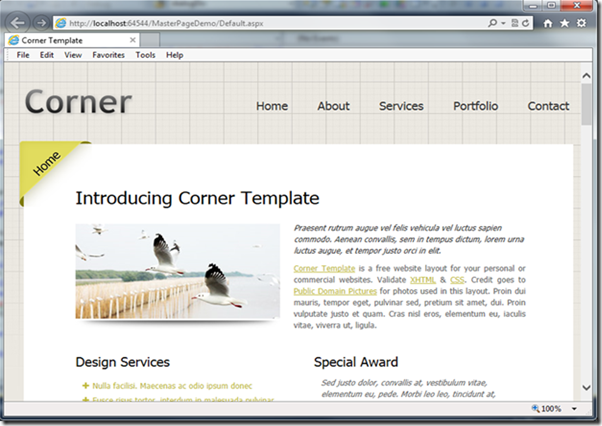
12. Final product for this example:
clip_image028

Making a SharePoint Workflow Delay Activity Configurable

If you are creating a SharePoint Workflow with a Delay Activity in Visual Studio, and want to be able to change the delay timeout through a configuration file—for example: to have a short delay for testing and a longer delay in production without having to recompile your code—then this setup is actually quite simple.

I’ve decided to write this short post because, although this is really the same as reading a config entry from any other .NET based program, SharePoint workflows can be a little intimidating and make you think that things aren’t as simple as they are in, say for example, a straight ASP.NET web forms app.

However, it really is this simple:

  1. Add an AppSettings entry to the web.config in your Virtual Directory location (i.e. C:\inetpub\wwwroot\wss\VirtualDirectories\MySharePointSite\web.config) something like this:
  2. <appSettings>
    <add key=”WorkflowDelayTimeoutDuration” value=”00:05:00″/>
    </appSettings>

  3. Read the app setting value from the code behind of your workflow for the delay activity in the Invoked event handler (notice I put a default value in the else block) :

  4. private void onWorkflowActivated1_Invoked(object sender, ExternalDataEventArgs e)
    {
    workflowId = workflowProperties.WorkflowId;


        if (ConfigurationManager.AppSettings["WorkflowDelayTimeoutDuration"] != null)
    {
    delayActivity1.TimeoutDuration = TimeSpan.Parse(ConfigurationManager.AppSettings["WorkflowDelayTimeoutDuration"]);
    }
    else
    {
    delayActivity1.TimeoutDuration = new TimeSpan(1, 0, 0);
    }
    }

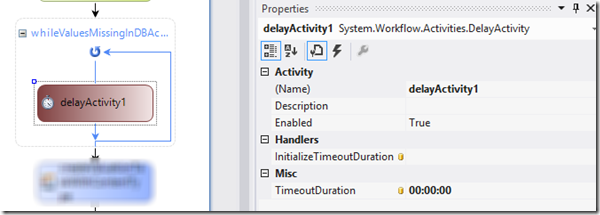
  5. For your reference, here is what my Properties window looks like in this scenario:

image

CSS Not Loading When Hosting in IIS

I ran into a problem recently that I had not encountered before.  On a fairly new dev laptop, where I use mostly use Cassini and IIS Express for development, I had need to deploy a site to IIS.  I have IIS 7 on my machine.

When I ran the site being hosted in IIS, my CSS was obviously being ignored by something, somewhere.  The CSS wasn’t rendering the page weird—I mean it wouldn’t render at all.  Although it worked with the same site when I ran it from Visual Studio.

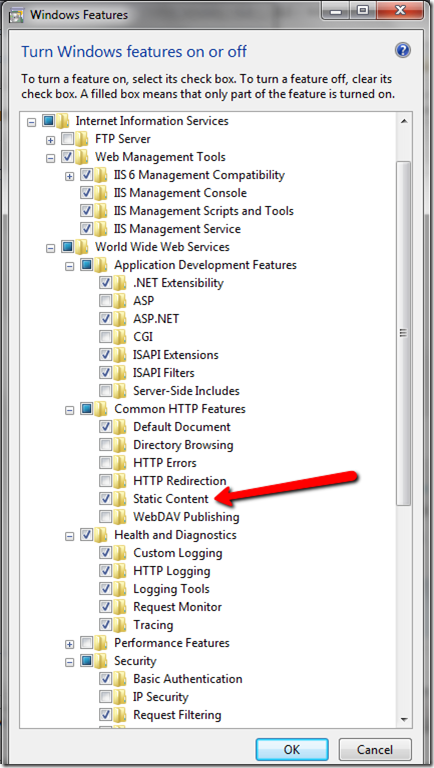
Long story short, after some digging and help from a friend, I realized this was due to one little checkbox that I failed to check when turning on the IIS features on my laptop: STATIC CONTENT—under the Common HTTP Features section.

staticContentInIIS

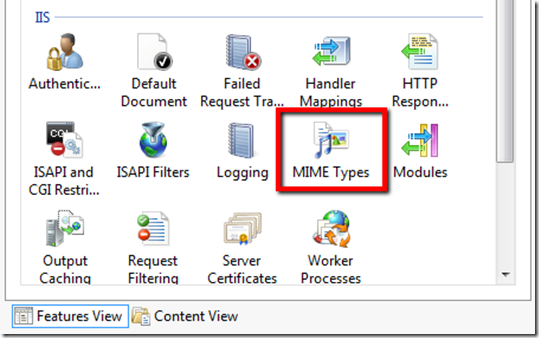
Without this, many MIME types will not be recognized by IIS—including CSS files being mapped to the “text\css” MIME type.  Which leads to another interesting point: You’ll notice that the MIME Types icon is missing from the Features View of IIS if Static Content is not turned on (generally between Logging and Modules).

mimeTypesInIIS

Hope this saves you some time and a headache!  BTW—I was fortunate enough to discover this problem during a presentation.  Confused smile

OneNote not opening from SkyDrive

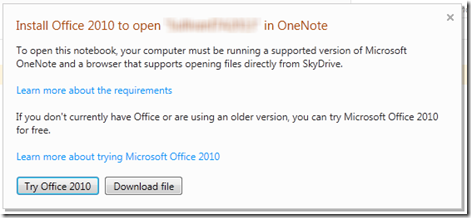
The Error:
“To open this notebook, your computer must be running a supported version of Microsoft OneNote and a browser that supports opening files directly from SkyDrive.”
image

The Situation:
I have multiple OneNote notebooks in my SkyDrive syncing with my computer.  Including OneNote notebooks from my Windows Live Groups’ SkyDrives.  All of a sudden, when trying to open a new OneNote notebook by clicking on the link to “Open in OneNote” from SkyDrive, it tells me that I either don’t have the correct version of Office or a compatible internet browser to do this.  But I’ve been doing it for well over a year.

Obviously, something—an update or recent download—messed something up, but I was never able to determine what it was.

Searching online for a couple of hours did little to help this issue.  I finally found one guy that briefly mentioned in some forum somewhere that he did a “Repair” on Office to fix this issue.  I decided to give that a try, and IT WORKED!  Here are the steps I went through.  Hopefully this will help save someone else some time.

The Fix:

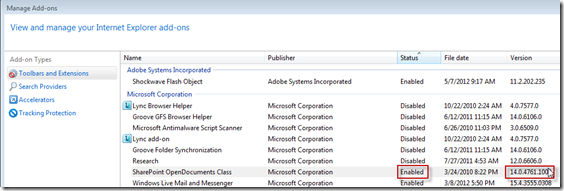
  1. I checked to see what version of the “SharePoint OpenDocuments Class” Add-On that I had in IE.  Find this by going to Tools > Manage add-ons in IE.  Somehow mine had reverted to 12.x.x.x instead of 14.x.x.x for Office 2010.  So, I disabled it.  I don’t know if that is required, but that’s the way I did it anyway.
    image
  2. Then I went to Control Panel > Programs and Features.  I clicked on Microsoft Office, clicked the Change button at the top, and chose to do a “Repair” in the dialog that popped-up.  Then I waited about 15 or 20 minutes for that to complete.
    image
  3. Then I rebooted my computer.
  4. Then I opened up IE9, went to Tools > Manage add-ons.  I saw that the v.14 “SharePoint OpenDocuments Class” Add-On was now there.  I then Enabled it.
    image
  5. I went to my SkyDrive, clicked to open my OneNote notebook in OneNote, and it worked!

Hope that helps!  Thanks for reading.

Camtasia Studio Not Recording Menus

UPDATE 6/20/2012: I have confirmed that this same bug exists in Camtasia Studio 8.0.0 as well.

TechSmith is a great company that makes great products (www.techsmith.com).  Camtasia Studio and Snagit are two of their products that I use, and as I discovered today, their customer support staff is awesome as well.

While working on a video series for a client I discovered a rare bug in Camtasia Studio Version 7.1.1.  How do I know it is rare?  Because the TechSmith support guy, after talking to a Senior support guy, told me that it was.  🙂

After playing back the demo that I had recorded I discovered that any menus from the menu bar or context menus did not show up in the video.  I happened to be recording Visual Studio 2010, but from my understanding this is not specific to the program being recorded.  This will also leave intellisense out of your videos–for my fellow Visual Studio developers.

I could still see my mouse movements as if they were clicking on menus and submenus, but all you could see is the normal part of the program that would lie underneath those menus.

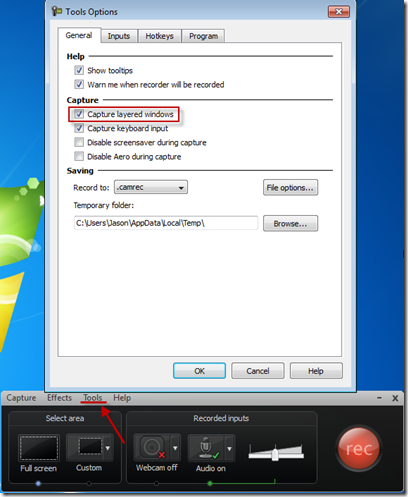
THE FIX (screenshot below):

  1. Open “Camtasia Recorder” (not Camtasia Studio)
  2. Go to Tools > Options
  3. On the “General” tab, Uncheck “Capture layered windows”
  4. Click OK
  5. Reopen Options
  6. Recheck “Capture layered windows”
  7. Click OK
  8. Problem solved

Like I said, this bug is quite rare according to the TechSmith folks.  So like me, you probably were having trouble finding any info on it if you are one of the lucky folks to come across this problem.  🙂  So, I hope this saves you some time.  Thanks for reading!

image

Programmatically determine Parent Web’s Absolute URL from SharePoint Client Object Model ListItem

Ok, after a frustrating while of trying to figure out an easy way to get the FULL (Absolute) URL for a ListItem’s parent web using the SharePoint Client Object Model I discovered one thing for sure: There are an abundance of ways to easily find the ServerRelativeUrl for many objects in the Client OM, but that is not what I needed.

After talking to a co-worker, we finally found an easy way to get the parent web’s absolute URL when dealing with at Client OM ListItem.  The key is looking at the Context.

Assuming that you have a variable called “item” that represents an SP Client OM ListItem, you can get the full URL for the parent web like this:


string parentWebAbsUrl = item.ParentList.ParentWeb.Context.Url;

Sometimes it’s the simple things that get you.  Hope that helps you save some time!  Thanks for reading.

Programmatically determine List Type in SharePoint Client Object Model

If you would like to programmatically determine a List Type in C# using the SharePoint Client Object Model, then all you need to do is compare the list’s BaseTemplate, which is an integer identifier, to one of the ListTemplateType enumeration values—casting it to an int as seen below:

bool isDocumentLibrary ;
using (ClientContext clientContext = new ClientContext(baseSiteUrl))
{
    Web web = clientContext.Web;
    clientContext.Load(web);
    List list = clientContext.Web.Lists.GetByTitle(listName);
    clientContext.Load(list);
    clientContext.ExecuteQuery();

    if (list.BaseTemplate == (int)ListTemplateType.DocumentLibrary)
    {
        isDocumentLibrary = true;
    }

}

That’s all there is to it.  Now you can take this and modify it in any way that you need to make list type determination more dynamic, if you aren’t just needing to compare to a single ListTemplateType as shown above.

CustomAction Link on Subsite Redirects to Parent Site—SharePoint 2007

I recently had a problem where a Custom Action link that we had added to a SharePoint subsite’s “Create” page was pointing to the relative URL of the parent site.  I discovered that it was because, without a “scope identifier” on the UrlAction element of the CustomAction, the relative URL will default to the root site of a site collection.  So, to fix the problem I added “~site” to the beginning of the URL as you can see here:

<CustomAction Id="CreateCustomPage" GroupId="WebPages"
     Location="Microsoft.SharePoint.Create" Sequence="400"
     Title="Page from Template" Description="Creates a branded page."
    
RequireSiteAdministrator="True"
     I
mageUrl="/_layouts/images/ltblnkpg.gif" >

 <UrlAction Url="~site/_layouts/CustomDirectory/CustomPage.aspx"/>

</CustomAction>

Without including the “~site” statement this will, apparently, default to the root of the site collection, which means your subsites will redirect back to the root site without it.  After adding this everything worked fine.  All of my subsites go to the proper relative URL of their own.

Andre Vala has a great blog post that discusses SharePoint Custom Actions in greater detail.  This blog also explains the other items that you can place at the beginning of the UrlAction’s URL besides ~site (i.e. ~sitecollection and others), and it helped me to figure this problem out fairly quickly.

Technorati Tags: ,,,,,,,,,

Windows Live Tags: WSS,MOSS,CustomAction,Subsite,Parent,SharePoint,Custom,Action,UrlAction,Microsoft

Adding Table Cell Borders to Empty Cells in a SharePoint DataFormWebPart

If you’ve ever used a DataFormWebPart in SharePoint Designer 2007 with a border on the table, then you may have run into the problem of empty table cells loading without borders.  This causes your table to look very strange in the browser.  Well, here is a fairly simple work around to fix the problem.  All you need to do is add a script block to the xslt in SharePoint Designer that will basically put a space inside all of the cells.  Since this forces the cells to not be empty, they will all render with borders.

Here is the script block and some quick screenshots to demonstrate how it works.

<script type="text/javascript">
    document.write("&amp;nbsp;");
</script>

Here is how the table will render without the script block if there are empty cells:

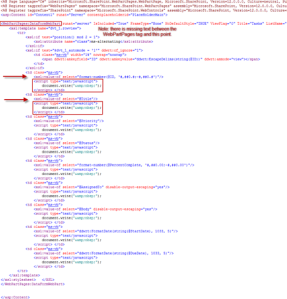
Add the script block inside of the td’s just after the xsl:value-of tags that contain the SharePoint field names that you have included in your DataFormWebPart:

Here is what the new page with blank cells should look like:

Technorati Tags: ,,,,,,,,,,,,

Windows Live Tags: WSS,MOSS,Table,Cell,Borders,SharePoint,DataFormWebPart,Designer,script,forces,Here,text,Cells